Originally I had planned to reflect on the power of stories but I realized I want to address something that has always frustrated me about higher education.
I think it’s pretty cool that students are granted access to archives and databases and journals, and I appreciate all the technology we get to try out and use while we’re students, but what happens when we graduate?
Suddenly those resources are locked behind paywalls or in the case of technology like Adobe products, you’re paying insanely expensive subscription prices AND you’ll be charged a hefty fee for canceling the service if you stop. That’s…not accessibility. That’s actually quite the opposite in my mind- almost predatory to get people used to free systems they will then have to pay (exorbitantly) for later down the line.

In the spirit of my art roots I decided I’m going to provide everyone with some free or low cost alternatives to some of the tech we’re using right now, or will be using. I can’t promise they works exactly the same way some of the industry standard programs do, but they’re accessible and often propped up by communities of like minded people.
I realize the tech industry trying to force their way into the arts probably skews the perception of how artists feel and react to sociopolitical moments like the one we’re in now, but historically times like these produce the most outspoken and counter culture responses in the arts. Sometimes that’s big bombastic movements and sometimes that just means taking care of each other and providing resources when others need them.
For my part today I’m going to show the systems I use to get around “big tech” or at least some of them. Sometimes that means using other big tech in the process but this is about gaining access where it’s indirectly denied, not digging your heels in. I’m a big believer that art and knowledge are the two best tools we have against hate and suppression and both of those things require some modicum of access to resources, so here we go!
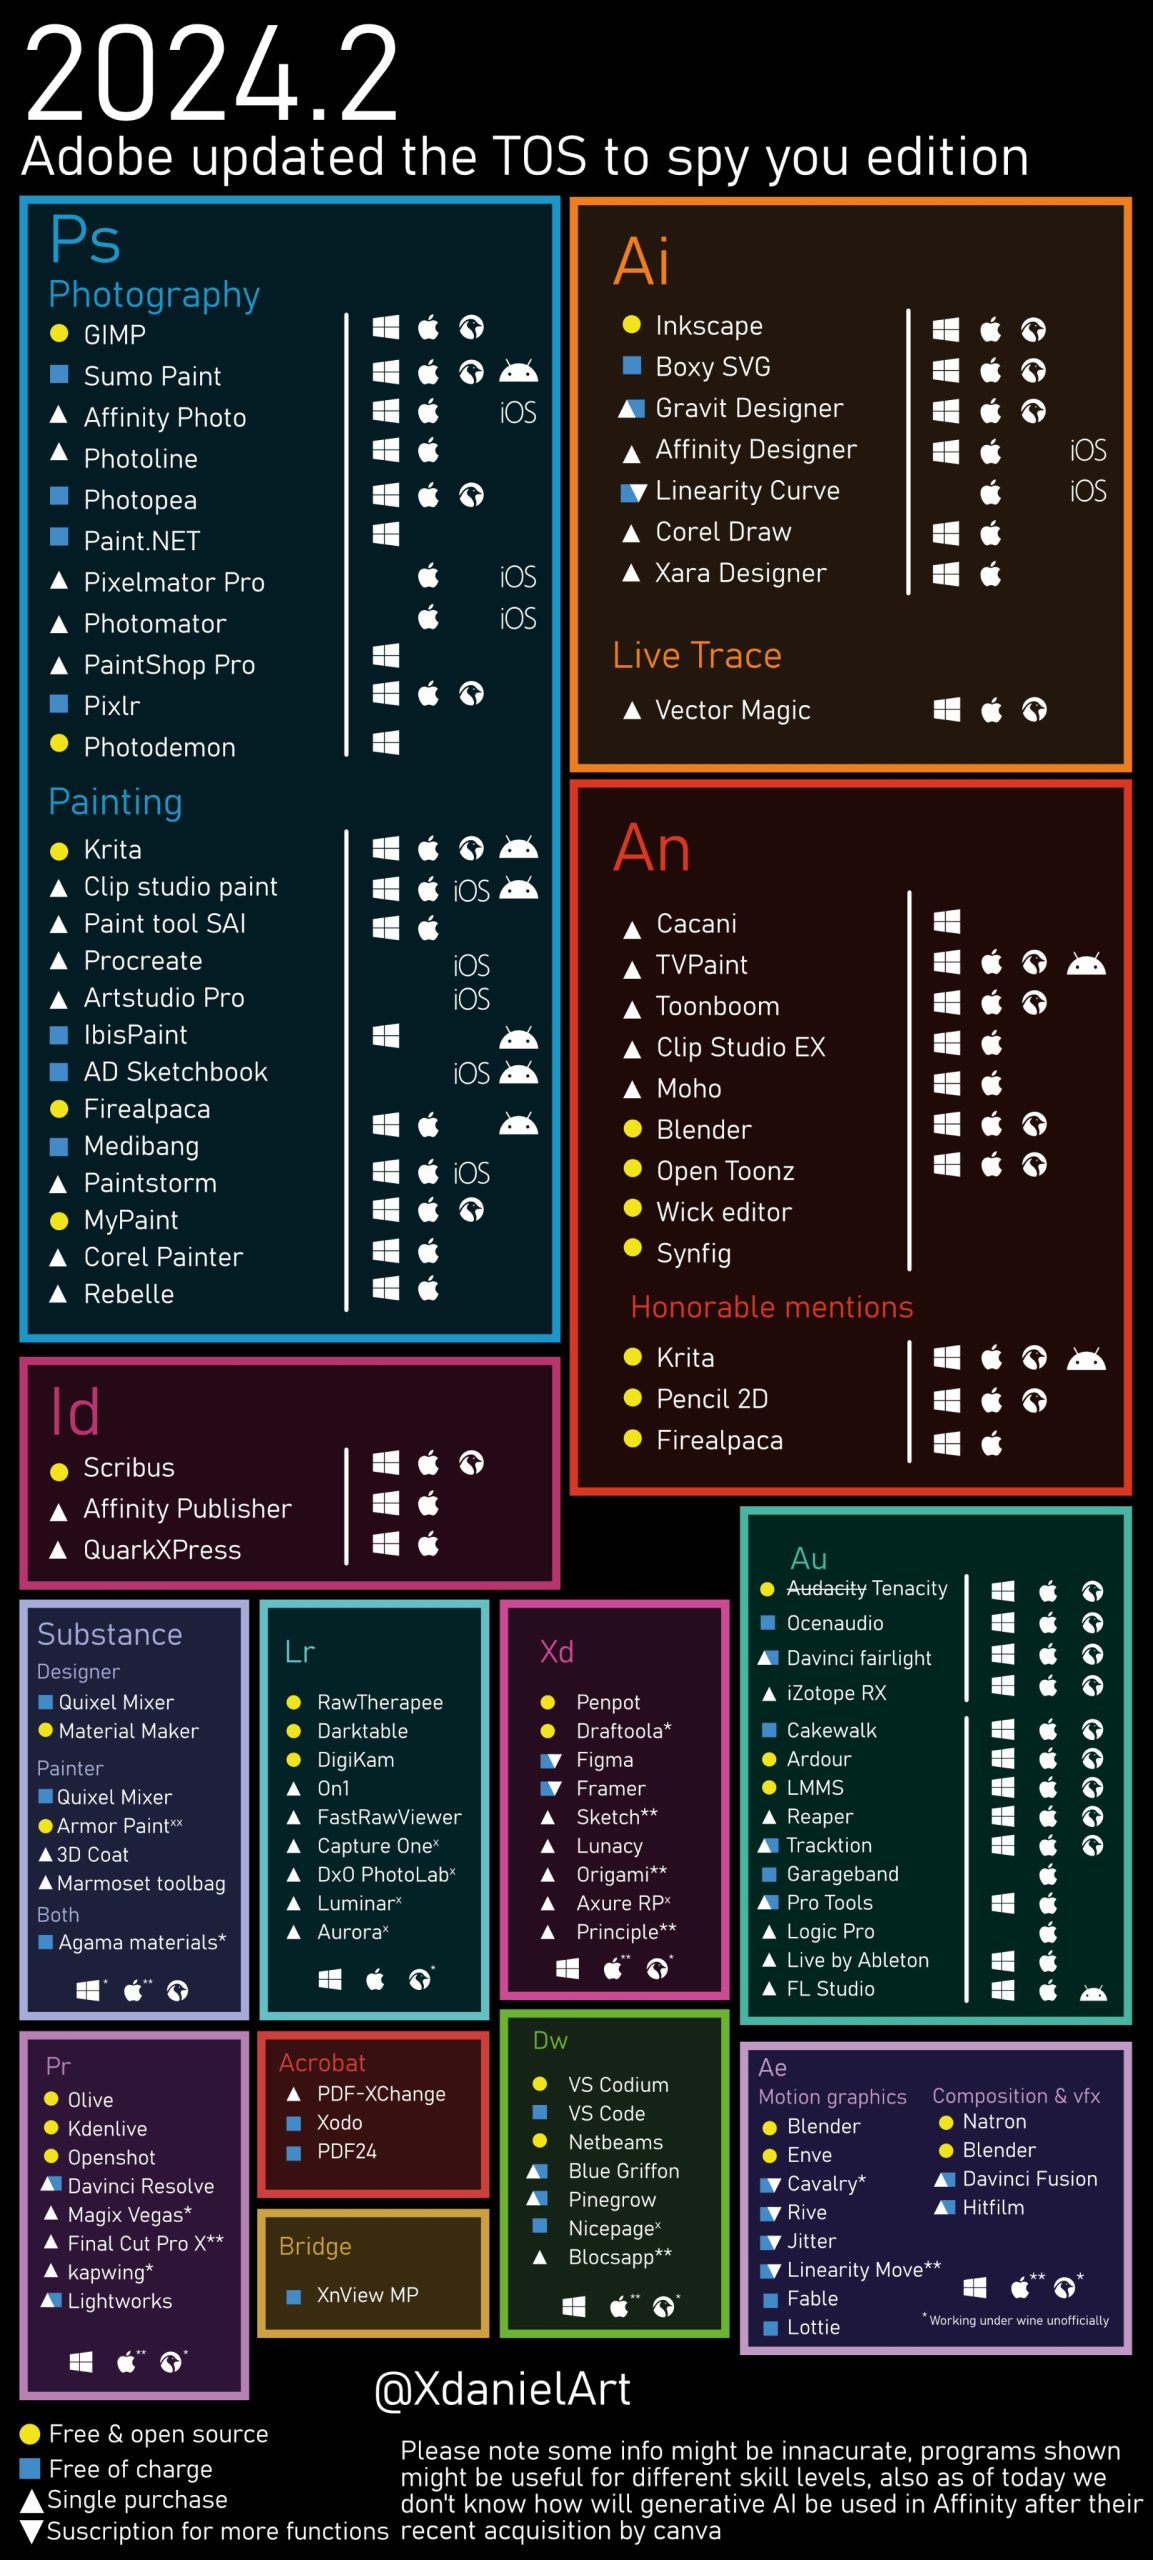
This handy chart has been making the rounds in certain circles for years. The one I’m using is by XdanielArt on the site formerly known as Twitter. It gets updated every so often with new programs and this one is pretty comprehensive. It shows mostly Adobe alternatives with a color and shape keys to indicate what programs are free and open source, free of charge, single purchase, and which have subscription options for more functions. You can also see icons showing which systems can operate those programs. For most of us the Ps (Photoshop) alternatives are the most relevant. You can see the programs divided into best use for photography and best use for [digital] painting.
Note: The Ai on this chart is not the same thing as AI. Ai with the lower case “i” is an indicator for Adobe Illustrator.
I’ll plug Clip Studio Paint here. It’s my chosen program and it goes on sale pretty regularly. I got my copy for about $30 and it can do almost everything Photoshop can do. The trick is the layout is different so it has a learning curve. It’s not meant for photo manipulation but you can absolutely use it for most of what we’ll be doing in our classes. There are tons of tutorials online, both from the company and many more from the community. You can also download free assets from the “store” made by other users. Some are paid but most artists don’t charge. It’s an art program first and it feels like it, but you can make it work.
My next suggestion is Readers. Again, adobe is out there but if you need a PDF reader (or frankly most other files) I would suggest Calibre or SumatraPDF. Both programs are free. If you like playing with metadata Claibre is your program. That said, you don’t have to do that. You can just use it to read documents or epub files. The thing is, because of it’s robust capabilities it’s pretty beefy. This is where SumatraPDF shines. It can’t do everything Calibre can do but it’s fast, simple, and it doesn’t take up much space.
Operating systems:
Calibre =Windows, MacOS, Linux, Portable, and possibly support for ios and android but I’m not sure the full extent.
SumatraPDF = Windows exclusive for now (Only one guy maintains the thing so progress takes time)
Supported formats:
Calibre=
Input Formats: AZW, AZW3, AZW4, CBZ, CBR, CB7, CBC, CHM, DJVU, DOCX, EPUB, FB2, FBZ, HTML, HTMLZ, KEPUB, LIT, LRF, MOBI, ODT, PDF, PRC, PDB, PML, RB, RTF, SNB, TCR, TXT, TXTZ
Output Formats: AZW3, EPUB, DOCX, FB2, HTMLZ, KEPUB, OEB, LIT, LRF, MOBI, PDB, PMLZ, RB, PDF, RTF, SNB, TCR, TXT, TXTZ, ZIP
*Note: Calibre is very useful for file conversion if you can’t do that with any other programs.
SumatraPDF=
Input Formats: PDF, eBook (epub, mobi), comic book (cbz/cbr), DjVu, XPS, CHM, image viewer for Windows.
Output Formats: Unclear, it’s not designed for file conversion but some basics may be possible.
I recommend reading about both programs to see which one fits your needs. Both have resources like manuals and FAQs. In calibre’s case videos and tutorials. You can hit up their Wiki pages if you want more background info.
Audio readers! I’m one of those people who thinks reading is reading, I don’t care how you do it. But more importantly for this post sometimes when you’re exhausted or your brain is bored of one format, switching to another can be the solution. My trick is to listen to articles.
There are programs you can pay for but I use free options. The best one I’ve found (shockingly) is opening your document in Microsoft Edge.
Yeah I know, but it turns out Edge has a really good audio option. You just need to open the document and choose to turn on the audio reader. It’s got a wide variety of voice options, including other languages. They aren’t quite as sharp as AI readers but they’re free and they work. Much better than the old style computer voices from decades past. They do mess up on words and sometimes they’ll read citations etc. but it’s a small thing to deal with.
Steps: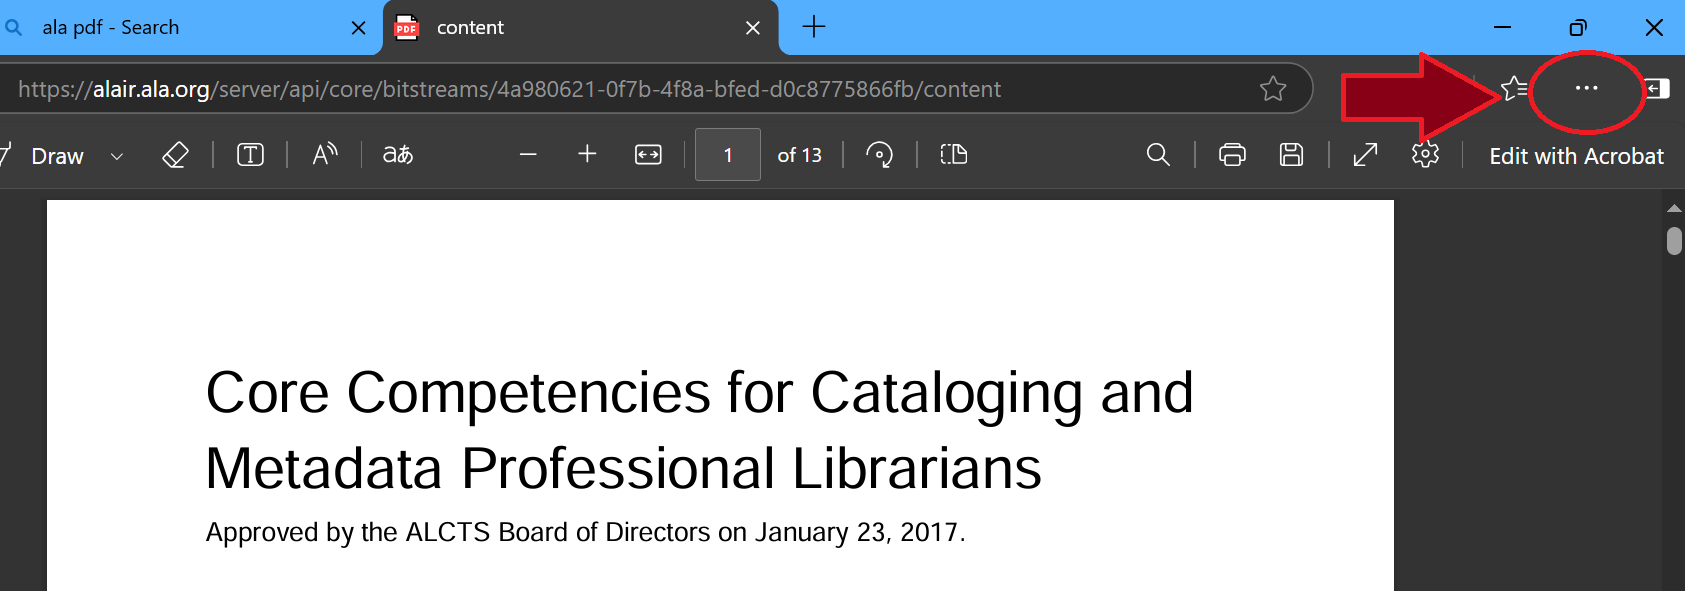
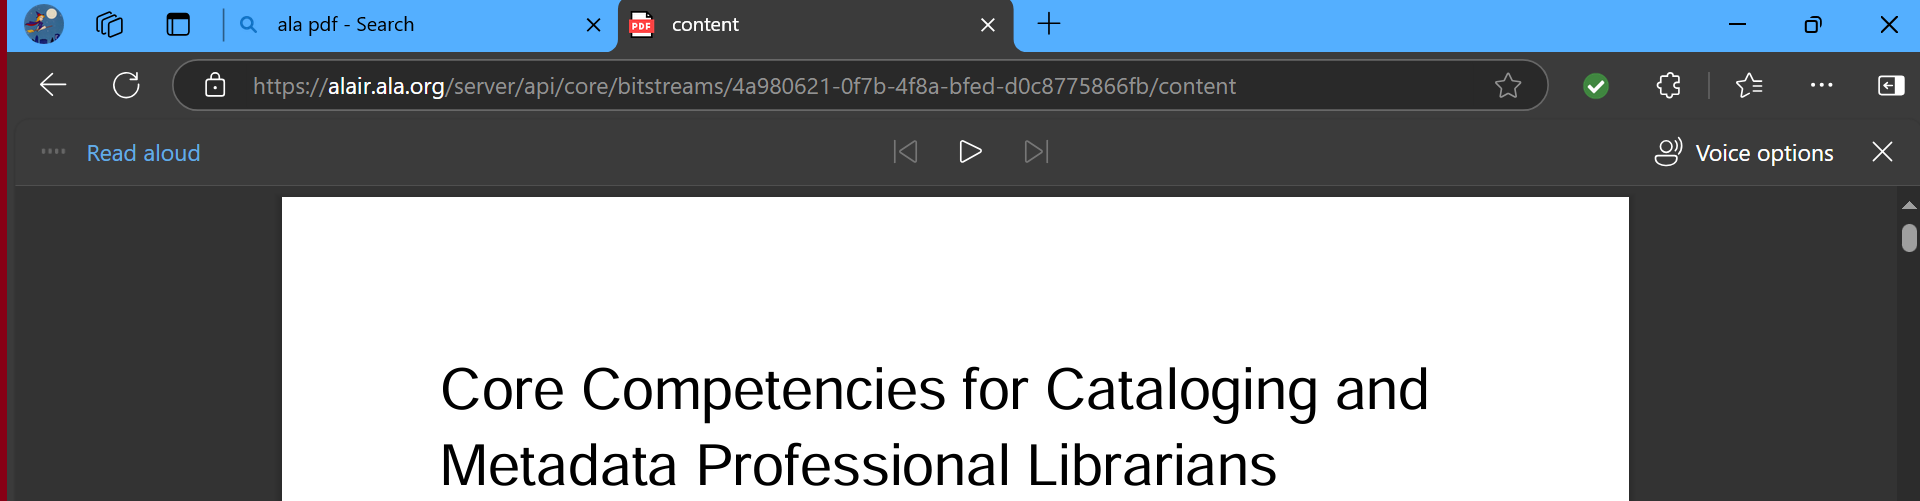 You can see the bar at the top once the reader is on and the voice options off to the right. Clicking this will give you a drop down of voices and you can adjust the speed etc.
Now, if you have Claibre it ALSO has an audio reader. Fewer options than Edge and I found the process kind of hard on my computer, but it’s there and tutorials for making it happen are online already. The thing is, you’ll need to download anything you want it to read. With Edge you can just open the document in the browser. You’ll just have to weigh the pros and cons and consider what your computer can handle.
My final trick is simple. What do you do if you can’t get a document to download or a page won’t let you copy something? Well, you might have the option of a tool on your browser that will copy it for you (I use the screenshot tool on Firefox) but if that isn’t an option or technology is being janky, then what? You can go old school. Use the PRT SC button on your keyboard to take a screen capture or screenshot of your entire screen, toolbar and all. It’s a very basic command but it will do the job. Next after you hit that button you need to open the default paint program that comes with Windows. Mac users I’m sorry I don’t know if this process is similar but there might be a Mac version somewhere.
Okay, once you open paint you hit CTRL (control) and press V to paste the screencap you just took into the program. You need to hold the control button down while pressing V once. Otherwise it will not register as a command.
This is how I made the images of the Edge audio reader instructions. You now have an image of your screen on paint. From here you can drag the image to the top left corner of the screen to cut out any information you don’t need, then you scroll down at click outside the image to adjust the right side. If you don’t click outside of it first you’ll skew the image, which you don’t want. After clicking outside the image you will find a tiny box in the right bottom corner. Hover over it until you see a two way arrow. This is when you drag the corner up and crop the image. Newer paint programs I believe have cropping options so you might not need to do it this way but consider it backup knowledge. From here you can save the image like any other to your computer, with a few different image file options.
I know the instructions sound confusing so I’m going to link to a video I made of myself doing this for an assignment. It should be accessible to everyone signed in with their SJSU email.
Paint Screencap Tutorial
Can you do this with the other programs from the first part of my post? Sure! In fact if you can right click and copy an image you can create a new document in Clip Studio Paint (and many others) from your clipboard which basically fits the dimensions of whatever you copied. Very smooth process. This is for when things aren’t going how you planned. It’s a work around for when all else fails.
That’s it for my most used tips and tricks. There are certainly more but I think these are the most useful for our program. I know this isn’t exactly on topic but if nothing else it’s an example of how I will go about assisting my patrons and my community as an information professional.